In my current role as Director of Product Engineering at FINCURA, I’m often thinking about our front end architecture. For our front end application, we use Angular, with our main concerns being: reliability, testability, and speed to develop new features. To address these concerns, we’ve developed the following architecture.
Angular architecture comes down to three main players: services, container components, and presentation components (to read more about these, Angular University has a great post on this topic).

[image is from internal FINCURA documents]
I’m going to explain each of these pieces separately, but to get a snapshot of what’s going on, take a look at this diagram:

[Image by Claudo Clavijo from his slideshare deck at https://www.slideshare.net/paucls/angular-and-redux]
Services
Services will do the heavy lifting for your application. They should contain all business logic in your application (https://malcoded.com/posts/angular-fundamentals-services/), because business logic will typically be used system-wide. In order to ensure maximum reusability, make sure you can access business rules easily. Angular’s dependency injection for services makes it trivial to reuse service methods site-wide.
If you’re not using Redux, you will want to store system-wide state in services. One common example is keeping the current logged in user as a variable in the `UserService`. It is an alternative option to store common state in a system-wide container component that is the master parent. However, if you do this, there will be instances in your application where you pass a `user` variable down in many places. You can expect most components to need the `user` variable at different times. I call this “Input() Hell” and it’s not all that different from “callback” hell.
Services don’t have any visual output. They process data for components and then components are the part of the infrastructure that display information.
According to Angular’s official documentation, “services are the easiest files to unit test” () and I agree with that statement. Generally, when you test services, you don’t need to worry about the Angular TestBed. Services aren’t much more than regular javascript classes. My go-to method for testing services are to instantiate the service classes with their dependencies mocked with jasmine’s “createSpyObj” method. Once I do that, I can write tests as if I was dealing with a regular javascript class. Here’s a quick example of a test I wrote a few weeks ago:
describe('PortfolioService', () => {
    let portfolioService: PortfolioService
    const apiServiceSpy = jasmine.createSpyObj('ApiService', {'send': of( { response: { objects: [] }} ) } );

    beforeEach(() => {
        portfolioService = new PortfolioService(apiServiceSpy);
    });

    describe('#cssColorNumber', () => {
        beforeEach(() => {
            const portfolios = [
               { name: 'Portfolio1', id: 0 },
               { name: 'Portfolio2', id: 1 },
               { name: 'Portfolio3', id: 2 },
               { name: 'Portfolio4', id: 13 },
               { name: 'Portfolio5', id: 14 },
            ];

            portfolioService.portfolios = portfolios;
        });


        it('returns id index +1 of id found', () => {
            const expectedResult = 5;
            const result = portfolioService.cssColorNumber({name: 'Portfolio5', id: 14});

            expect(result).toEqual(expectedResult);
        });
    });
});
In the test above, we are testing the output of a method that returns the index+1 of objects found in an array by their id. Before each test, we instantiate the service class with a mocked dependency injection. We apply sample data to the service we are testing. Then, we are able to test this with a simple expectation. No TestBed needed and no complicated setup that typically comes with the TestBed.
In summary, services should contain all business logic for your application, contain shared state over different pieces of the application, perform all api calls, and have no visual output. They are also much easier to test than presentation components.
Container Components
Container components get their name because they contain presentation components, and always pass data down to these presentation component layers. They are sometimes referred to as smart components. In many cases, you will have nested container components that pass data down to other containers, which eventually pass data down to presentation components.
It’s difficult to get a true sense of what this looks like without an example, so let’s take a look at how this works in practice.
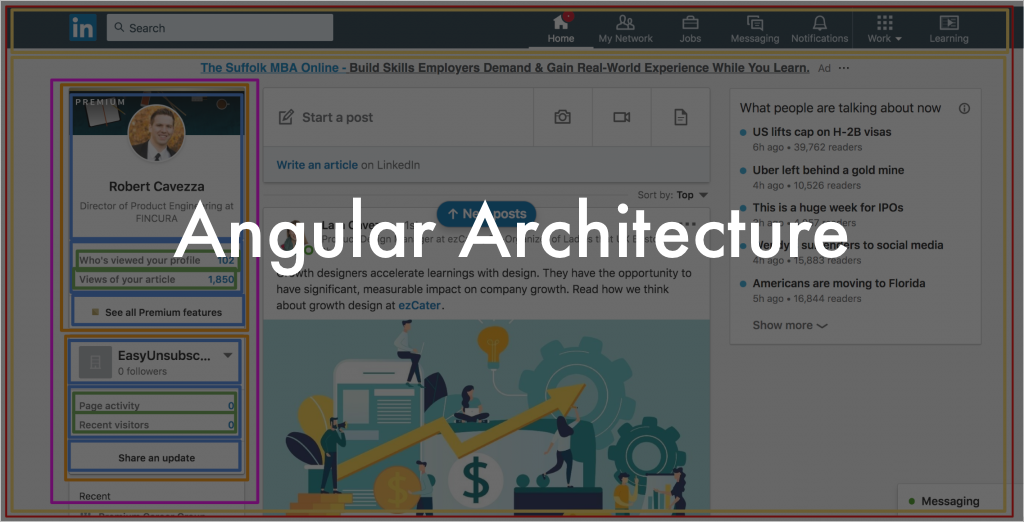
Let’s take a look at my LinkedIn homepage. This is what I see when I log into LinkedIn.

Here’s an attempt to break this up based on what I assume LinkedIn’s container components and presentation components are (in their front end architecture). Note: Most of my abilities to mock up container components and presentation components comes from reading Thinking in React.

The different colors represent the hierarchies of container components. The main focus for drawing components in this example is the left side navigation bar and all of its parents (which are also container components). The entire page is wrapped by a red line. This will typically be called “app-component” in an application. The next yellow layer of hierarchy separates the top navigation bar from the main wrapper component, which will represent the body of the page. The pink layer is the container for the sidebar. After that, the orange breaks up each of the clearly separated panels. Then the panels are further subdivided into separate child components. The red, yellow, purple, and orange are all container components. Once we get past that, it’s a little more hazy depending on what exactly the application is doing and how granular LinkedIn builds its presentation components. Once you get down to the green layer, you are now looking at presentation components. It’s pretty easy to tell how the top 2 green rectangles and the bottom two green rectangles are probably reused presentation components based on how similar they look.
In our Angular application, we utilize a technique that React has made famous called “lifting state up” (https://reactjs.org/docs/lifting-state-up.html). This means that we store the state used by numerous different components at their lowest shared parent component.
Let’s use LinkedIn’s homepage for this example as well. In our current working example, we have one instance of a user’s avatar on the page. A product manager has come to us and has told us that she wants to add a new item to the top navigation component that contains the user’s avatar. The mockup she gives us looks like this:

[The mockup our PM has given us. Click to enlarge]
If we look closely at the page that we marked up with the component structure, we can see that we already have the avatar on the page. One option is to call our user service again as part of the navigation component, but http calls are expensive. Instead, we want to move where we store the user’s avatar information up to a common parent of both the side navigation bar and the top navigation header. That common parent is the component that we highlighted with a red outline – “app-component”.
If we are currently calling the UserService.getUser method in the orange panel container component, we will now want to call that method in app component (the red wrapper). Then, we will pass down the avatar url as “@Input()”s down to the yellow, down to the maroon, and then down to the orange, where it lived to begin with. We will also pass that same value down to the yellow navigation component and to its children where the new html element will live and display the avatar on the navigation bar.
Containers do not do a lot of heavy lifting for the visual components, but they do have a key presentation responsibility. That responsibility is the placement of presentation components. A good rule of thumb is that you don’t want presentation components to have margin css attributes. The positioning of presentation components should generally be controlled by their parent container components.
Testing container components is generally the hardest of the three types of files we discuss in this article. The main reason for this is the handling of state. State changes and angular lifecycle methods need to be tested. This causes added testing complexity. A key reason to separate out container components and presentation components is so you test container components less and presentation components more.
Presentation components
Presentation components are sometimes referred to as “dumb” components, used mostly to display information. Presentation components will inherit all data and events (@Input()s and @Output()s) from parent components. They are entirely visual output components.
Continuing with our LinkedIn example, we can see a presentation wrapped in green:
This presentation component is used four times on this page, in two separate places. You can reasonably guess what the inputs and outputs are for this presentation component.
![]()
The inputs and outputs for this component will probably look something like this:
@Input() label
@Input() value
@Output() onClickLabel
@Output() onClickValue
These inputs and outputs are passed in by their parents.
Why separate container and presentation components?
There are three reasons: (1) reusability, (2) testability, (both reusability and testability cited from this article), and (3) ease of use for HTML/CSS designers.
(1) Reusability
If you break components down into smaller and smaller pieces, you will be able to reuse different components in different areas of your code. You can see this in the LinkedIn example with the green outlines on the sidebar. This is all about the “DRY” (don’t repeat yourself) principle. If you didn’t break those green outlines into presentation components, you would have coded the same thing twice. If you later got instructions to change something there, you would have to make changes in multiple places. Doing this usually leads to bugs.
(2) Testability
Presentation components are much easier to test than container components. When you remove state and lifecycle methods as concerns, testing is much easier. Yes, you do need to test container components. It’s a part of writing good, maintainable code. However, the more testing you can do in presentation components, the better off you will be.
(3) HTML/CSS Developers
Many software teams have varying degrees of skillsets. It is not unusual to have someone on the team that knows HTML and CSS really well, but little javascript. When you separate presentation components and container components, it is now a lot easier for HTML/CSS specialists to tweak design-related code. Using a tool like Storybook works wonders on letting HTML/CSS developers control design elements.
Conclusion
This architecture has worked well for us. Separating logic into services, container components, and presentation components has made testing easier. Having a well tested codebase has allowed us to have a much more stable application.
Breaking components down into presentation components has increased our code reusability. Code reusability has allowed us to deliver features faster and introduce less bugs.